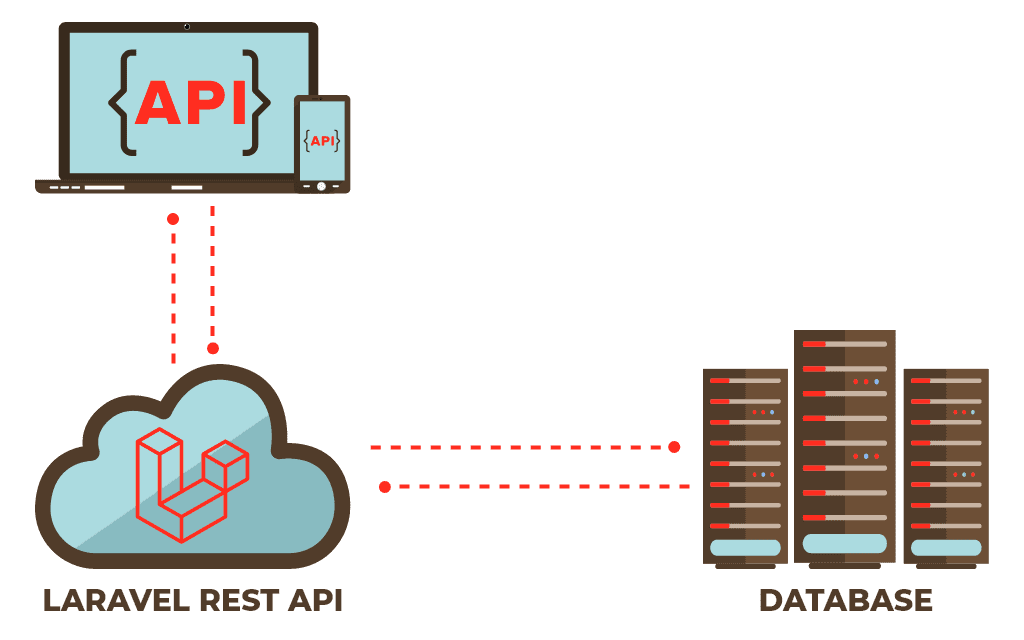
A RESTful API is an application programming interface that adjusts to REST engineering style’s limitations and considers cooperation with RESTful web services. REST represents an illustrative state move and was made by scientist “Roy Fielding.” This Laravel test-driven development tutorial will help you build a rest API with Laravel in the least time and effort.
Before starting our Laravel TDD tutorial, let’s understand what REST API is and its types.
What is REST API?
A REpresentational State Transfer API is an architectural style or set of concepts for an application program interface (API). REST API utilizes HTTP solicitations to access information that can be used to GET, PUT, POST, and DELETE information types, which alludes to the perusing, refreshing, making, and erasing activities concerning resources.
The key advantage of REST is that they offer a lot of flexibility and allow you to do more with this particular API. In this blog, we use Laravel REST API with Test-Driven Development without opening Postman or a browser.
Four main resource methods associated with REST API are:
- GET: A GET resource method requests the server to find the requested information and send it to you.
- POST: A POST allows the server to create a new entry in the database.
- PUT: A PUT request allows the server to update an entry in the database.
- DELETE: A DELETE request allows the server to DELETE an entry in the database.
The Anatomy Of A Request
It’s important to know that a request is made up of four things:
- Endpoint URL
- Method
- Headers
- Body or data
Endpoint URL: Endpoint is the URL you request for.
Method: The method is the type of request you send to the server. You can choose from these five types below based on the action you want the server to do.
- GET
- POST
- PATCH
- PUT
- DELETE
Headers: The REST headers and parameters contain a wealth of information that can help you track down issues when you encounter them. HTTP Headers are an important part of the API request and response as they represent the meta-data associated with the API request and response.
Body of data: The request body is used to send and receive data via the REST API. If we are using POST/PUT API, then we should send the whole resource information based on the REST API contract because these methods work on the whole resource.
What is a passport?
Laravel Passport provides a full OAuth2 server implementation for your Laravel application in a matter of minutes. Passport is built on top of the League OAuth2 server maintained by Andy Millington and Simon Hamp. In the Laravel framework, there is a built-in Login form. To develop API authentication and for authenticating a User in API, we need tokens. In general, API needs a token for accessing the user or authenticating a user. The Laravel framework comes with a Laravel passport package, which provides the full OAuth2 server implementation.
What does the OAuth2 server do?
OAuth2 serves to protect API with an access token or allows clients to request a new access token and refresh them.
Here are some grants supported by the OAuth2 server:
- Authorization code grant
- Implicit grant
- Client credential grant
- Resource Owner password credential grant
- Refresh grant
Index
- Install Laravel 8
- Install Passport Library
- Login API
- Logout API
- Create Product API
- Update Product API
- List Product API
- Find Product API
- Delete Product API
Server Requirements
- PHP >= 7.2.0
- BCMath PHP Extension
- Ctype PHP Extension
- Fileinfo PHP extension
- JSON PHP Extension
- Mbstring PHP Extension
- OpenSSL PHP Extension
- PDO PHP Extension
- Tokenizer PHP Extension
- XML PHP Extension
Follow the below steps to develop a restful API.
Step 1. Install Laravel
Now you have enough knowledge to get started with test-driven Laravel development. Next, we will start creating secure Laravel APIs. let’s create a fresh Laravel project by running the below command using terminal:
composer create-project laravel/laravel laravel-rest-API-with-tddcd laravel-rest-api-with-tddStep 2: Install Passport
Next, you need to add a passport library to build a rest API with Laravel.
composer require laravel/passportThe above command will install the passport in the vendor folder and will update composer.json. It is the official package of Laravel.
Step 3 Configure database
In this step, you need to configure the database in the .env file.request
...
DB_DATABASE=db_name
DB_USERNAME=db_username
DB_PASSWORD=db_password
...
Now, you need to migrate the database
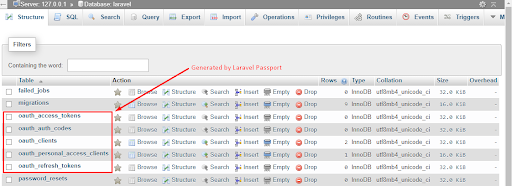
php artisan migratePassport’s service provider registers its own database migration directory, so you must migrate your database after installing the package. The Passport migrations will create the below table in your database. Where laravel will store OAuth2 clients and access tokens:
Passport tables:
- oauth_access_tokens
- oauth_auth_codes
- oauth_clients
- oauth_personal_access_clients
- oauth_refresh_tokens
Step 4: Generate the keys using.
php artisan passport:install
This command will create the encryption keys needed to generate secure access tokens in the above database.
Step 5 Register passport in service provider
Open the config/app.php file and update the provider array.
'providers' => [
    ...
    Laravel\Passport\PassportServiceProvider::class,
];
Step 6: Update User model:
Add passport trait into app/Models/User.php, which ships with many helper method passport methods to authenticate the user’s token and scopes.
// app/Models/User.php

<?php

namespace App;

...
use Laravel\Passport\HasApiTokens; // include this

class User extends Authenticatable
{
    use HasFactory, Notifiable, HasApiTokens;

    ...
}
Step 7: Call the passport route
To register the routes to issue and revoke access tokens (personal and client), you will have to call the Passport::routes method within the boot method of AuthServiceProvider.
Open the app/Providers/AuthServiceProvider file and update its content as shown below:
<?php

namespace App\Providers;

use Illuminate\Foundation\Support\Providers\AuthServiceProvider as ServiceProvider;
use Illuminate\Support\Facades\Gate;

use Laravel\Passport\Passport; // add this
class AuthServiceProvider extends ServiceProvider
{
/**
* The policy mappings for the application.
*
* @var array
*/
protected $policies = [
'App\Models\Model' => 'App\Policies\ModelPolicy', // uncomment this line
];
/**
* Register any authentication / authorization services.
*
* @return void
*/
public function boot()
{
$this->registerPolicies();
Passport::routes(); // Add this
}
}
After registering Passport::routes(), Laravel Passport is almost ready to handle all authentication and authorization processes within your application.
Step 8. Update API driver
For your application to be ready to use Passport’s TokenGuard to authenticate any incoming API requests, open the config/auth configuration file and set the driver option of the API authentication guard to passport:
// config/auth

<?php

return [
    ...

    'guards' => [
        'web' => [
            'driver' => 'session',
            'provider' => 'users',
],
'api' => [
'driver' => 'passport', // set this to passport
'provider' => 'users',
'hash' => false,
],
],
...
];The installation process is done, now we will learn how to set up API routes register, login, and CRUD operation.
Create Controller
Step 9 Authentication controller
In this step, we will use the artisan command to generate an Authentication Controller for the application. This controller will process and handle requests for registration and login for a user into the application.
We will create an authentication controller which will process and handle the requests for registration and login for a user into the application.
php artisan make:controller API/AuthControllerThis will create a new API folder within app/Http/Controllers and then create a new file named AuthController.php. Open the newly created controller file and update the code given below:
<?php

namespace App\Http\Controllers\API;

use App\Http\Controllers\Controller;
use App\Models\User;
use Illuminate\Http\Request;
use Validator;
use Hash;

class AuthController extends Controller
{
    public function register(Request $request)
    {
        $validator = Validator::make($request->all(), [
            'name' => 'required|max:55',
            'email' => 'required|email|unique:users',
            'password' => 'required|min:6'
        ]);

        if($validator->fails()){
            return response(['error' => $validator->errors()]);
        }

        $user = User::create([
            'name' => $request->name,
            'email' => $request->email,
            'password' => Hash::make($request->password)
        ]);

        $accessToken = $user->createToken('authToken')->accessToken;

        return response([ 'user' => $user, 'access_token' => $accessToken]);
    }

    public function login(Request $request)
    {
        $data = $request->all();

        $validator = Validator::make($data, [
            'email' => 'required|email',
            'password' => 'required|min:6'
        ]);

        if($validator->fails()){
            return response(['error' => $validator->errors()]);
        }

        if (!auth()->attempt($data)) {
            return response(['message' => 'Login credentials are invaild']);
        }

        $accessToken = auth()->user()->createToken('authToken')->accessToken;

        return response(['access_token' => $accessToken]);

    }
}
Step 10: Create Laravel test model and migration for product
php artisan make:model Product -mIn this step, we will create a Laravel test model. The above command will create the model App/Models/Product.php and migration file database\migrations\2021_07_18_113413_create_products_table.php
Update Model App/Models/Product.php
<?php

namespace App\Models;

use Illuminate\Database\Eloquent\Factories\HasFactory;
use Illuminate\Database\Eloquent\Model;

class Product extends Model
{
    use HasFactory;

    protected $fillable = ['name', 'sku', 'upc'];
}
Now update the migration file: database\migrations\2021_07_18_113413_create_products_table.php
<?php

use Illuminate\Database\Migrations\Migration;
use Illuminate\Database\Schema\Blueprint;
use Illuminate\Support\Facades\Schema;

class CreateProductsTable extends Migration
{
    /**
     * Run the migrations.
     *
     * @return void
     */
    public function up()
    {
        Schema::create('products', function (Blueprint $table) {
            $table->id();
            $table->string('name');
            $table->string('sku');
            $table->string('upc');
            $table->timestamps();
        });
    }

    /**
     * Reverse the migrations.
     *
     * @return void
     */
    public function down()
    {
        Schema::dropIfExists('products');
    }
}
Now run the migration to migrate products table
php artisan migrateThis will create a table named “products” in the database.
Step 11: Creating the Product Controller
php artisan make:controller API/ProductController --api --model=ProductThe command above will generate an API resource controller that does not include the create and edit view since we are only building APIs
Open app/Http/Controllers/API/ProductController.php and update the code is given below:
<?php
namespace App\Http\Controllers\API;
use App\Http\Controllers\Controller;
use App\Models\Product;
use Illuminate\Http\Request;
use App\Http\Resources\ProductResource;
use Validator;
class ProductController extends Controller
{
/**
* Display a listing of the resource.
*
* @return \Illuminate\Http\Response
*/
public function index()
{
$products = Product::all();
return response(['products' => ProductResource::collection($products)]);
}
/**
* Store a newly created resource in storage.
*
* @param \Illuminate\Http\Request $request
* @return \Illuminate\Http\Response
*/
public function store(Request $request)
{
$data = $request->all();
$validator = Validator::make($data, [
'name' => 'required|max:255',
'sku' => 'required|max:255',
'upc' => 'required|max:255',
]);
if($validator->fails()){
return response(['error' => $validator->errors(), 'Validation Error']);
}
$product = Product::create($data);
return response(['product' => new ProductResource($product), 'message' => 'Product created successfully']);
}
/**
* Display the specified resource.
*
* @param \App\Models\Product $product
* @return \Illuminate\Http\Response
*/
public function show(Product $product)
{
return response(['product' => new ProductResource($product)]);
}
/**
* Update the specified resource in storage.
*
* @param \Illuminate\Http\Request $request
* @param \App\Models\Product $product
* @return \Illuminate\Http\Response
*/
public function update(Request $request, Product $product)
{
$data = $request->all();
$validator = Validator::make($data, [
'name' => 'required|max:255',
'sku' => 'required|max:255',
'upc' => 'required|max:255',
]);
if($validator->fails()){
return response(['error' => $validator->errors(), 'Validation Error']);
}
$product->update($data);
return response(['product' => new ProductResource($product), 'message' => 'Product updated successfully']);
}
/**
* Remove the specified resource from storage.
*
* @param \App\Models\Product $product
* @return \Illuminate\Http\Response
*/
public function destroy(Product $product)
{
$product->delete();
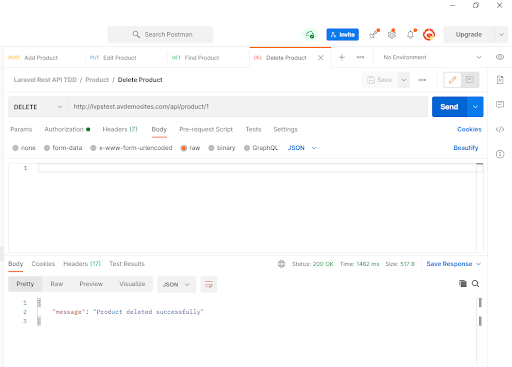
return response(['message' => 'Product deleted successfully']);
}
}Step 12: Create a Resource
Laravel Eloquent resources allow you to convert your models and collections into JSON format. It works as a data transformation layer between the database and the controllers. This helps provide a uniform interface that can be used wherever you need it within your application. Let’s create one for the Product model by using the following command:
php artisan make:resource ProductResourceThis will create a new resource file named ProductResource.php within the app/Http/Resources directory. Open this file and update the below code:
<?php

namespace App\Http\Resources;

use Illuminate\Http\Resources\Json\JsonResource;

class ProductResource extends JsonResource
{
    /**
     * Transform the resource into an array.
     *
     * @param  \Illuminate\Http\Request  $request
     * @return array
     */
    public function toArray($request)
    {
        return parent::toArray($request);
    }
}
Step 13: Update Routes File
To complete the set up of the endpoints for the methods created within our controllers, update the routes.api.php file with the following contents:
<?php

use Illuminate\Http\Request;
use Illuminate\Support\Facades\Route;
use App\Http\Controllers\API\AuthController;
use App\Http\Controllers\API\ProductController;

/*
|--------------------------------------------------------------------------
| API Routes
|--------------------------------------------------------------------------
|
| Here is where you can register API routes for your application. These
| routes are loaded by the RouteServiceProvider within a group which
| is assigned the "API" middleware group. Enjoy building your API!
|
*/

Route::middleware('auth:api')->get('/user', function (Request $request) {
    return $request->user();
});

Route::post('/register', [AuthController::class, 'register']);
Route::post('/login', [AuthController::class, 'login']);

Route::apiResource('/product', ProductController::class)->middleware('auth:api');
Run the following command to view the configured routes and their details.
php artisan route:list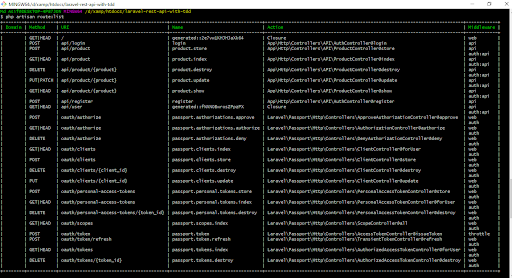
Run the Application
php artisan serveStep 14: Testing on postman
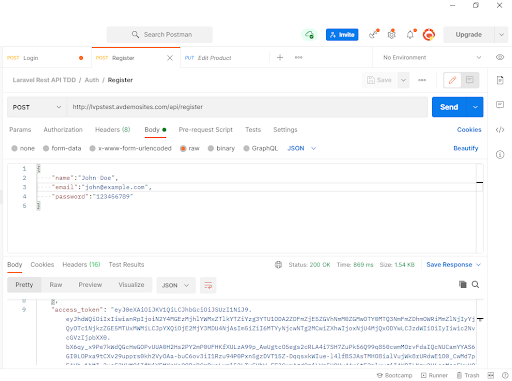
Now we have created the restful API using passport, next you should open the postman and perform the below action
- Register
- Login
- Add product
- Update Product
- Find Product
- Delete Product
- Get All Products
Register User
Method: POST
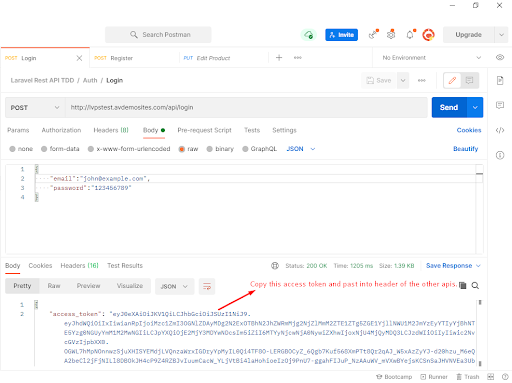
Login and get an access token
Method: POST
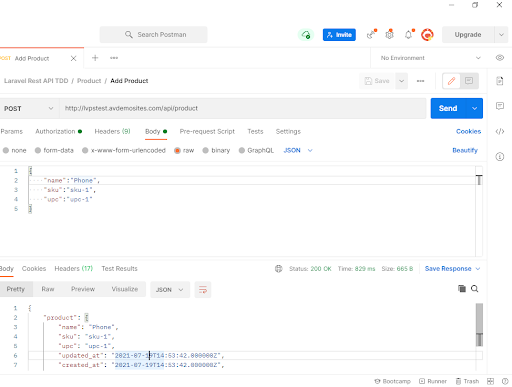
Add product:
Method: POST
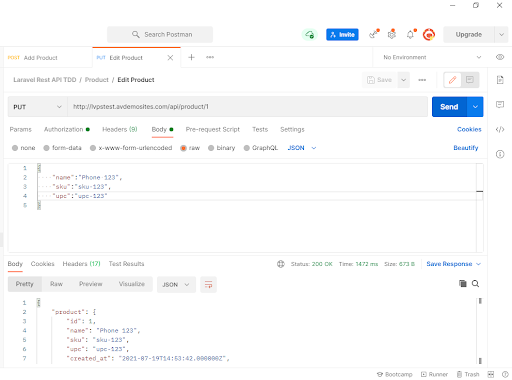
Update Product:
Method: PUT
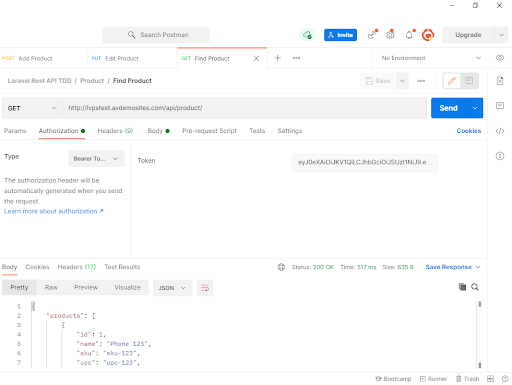
Find Product
Method: GET
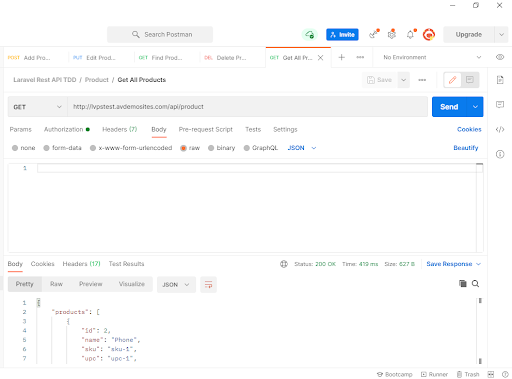
Get All Product:
Method: GET
Delete Product
Method: DELETE
Now let’s move on to Test-Driven Development (TDD). It means testing what we have just written.
As once said by James Groening, one of the pioneers of TDD and Agile development methodology:
“If you are not doing development through testing, then later you will do development through debugging”
James Groening
What is PHPUnit:
PHPUnit is one of the oldest and most well-known unit testing packages for PHP. It is primarily designed for unit testing, which means testing your code in the smallest components possible. Still, it is also incredibly flexible and can be used for a lot more than just unit testing. PHPUnit includes many simple and flexible assertions that allow you to easily test your code, which works really well when you are testing specific components.
PHPUnit with Laravel:

Laravel is built with testing in mind. In fact, support for Laravel functional testing with PHPUnit is included out of the box, and a phpunit.xml file is already set up for your application. The framework also ships with convenient helper methods that allow you to test your applications expressively.
Step 15: Generate test classes for AuthTest and update
php artisan make: test AuthTestThe above command will create a file under the tests/Feature directory; open this file update command below.
<?php

namespace Tests\Feature;

use Illuminate\Foundation\Testing\RefreshDatabase;
use Illuminate\Foundation\Testing\WithFaker;
use Tests\TestCase;
use App\Models\User;

class AuthTest extends TestCase
{

    public function testRegister()
    {
        $response = $this->json('POST', '/api/register', [
            'name'  =>  $name = 'Test',
            'email'  =>  $email = time().'[email protected]',
            'password'  =>  $password = '123456789',
        ]);

        //Write the response in laravel.log
        \Log::info(1, [$response->getContent()]);

        $response->assertStatus(200);

        // Receive our token
        $this->assertArrayHasKey('access_token',$response->json());

    }

    public function testLogin()
    {
        // Creating Users
        User::create([
            'name' => 'Test',
            'email'=> $email = time().'@example.com',
            'password' => $password = bcrypt('123456789')
        ]);

        // Simulated landing
        $response = $this->json('POST',route('login'),[
            'email' => $email,
            'password' => $password,
        ]);

        //Write the response in laravel.log
        \Log::info(1, [$response->getContent()]);

        // Determine whether the login is successful and receive token
        $response->assertStatus(200);

        //$this->assertArrayHasKey('token',$response->json());

        // Delete users
        User::where('email','[email protected]')->delete();
    }
}
Now open terminal and run command./vendor/bin/phpunit tests/Feature/ProductTest.php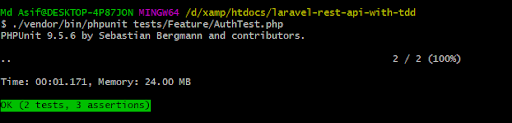
Step 16: Generate test classes for ProductTest and update
php artisan make:test ProductTestThis will create the file under the tests/Feature directory; open this file update command below.
<?php

namespace Tests\Feature;

use Illuminate\Foundation\Testing\RefreshDatabase;
use Illuminate\Foundation\Testing\WithFaker;
use Tests\TestCase;
use App\Models\Product;
use App\Models\User;

class ProductTest extends TestCase
{
    /**
     * Authenticate user.
     *
     * @return void
     */
    protected function authenticate()
    {
        $user = User::create([
            'name' => 'test',
            'email' => rand(12345,678910).'[email protected]',
            'password' => \Hash::make('secret9874'),
        ]);

        if (!auth()->attempt(['email'=>$user->email, 'password'=>'secret1234'])) {
            return response(['message' => 'Login credentials are invaild']);
        }

        return $accessToken = auth()->user()->createToken('authToken')->accessToken;
    }

    /**
     * test create product.
     *
     * @return void
     */
    public function test_create_product()
    {
        $token = $this->authenticate();

        $response = $this->withHeaders([
            'Authorization' => 'Bearer '. $token,
        ])->json('POST','api/product',[
            'name' => 'Test product',
            'sku' => 'test-sku',
            'upc' => 'test-upc'
        ]);

        //Write the response in laravel.log
        \Log::info(1, [$response->getContent()]);

        $response->assertStatus(200);
    }

    /**
     * test update product.
     *
     * @return void
     */
    public function test_update_product()
    {
        $token = $this->authenticate();

        $response = $this->withHeaders([
            'Authorization' => 'Bearer '. $token,
        ])->json('PUT','api/product/9',[
            'name' => 'Test product111',
            'sku' => 'test-sku',
            'upc' => 'test-upc'
        ]);

        //Write the response in laravel.log
        \Log::info(1, [$response->getContent()]);

        $response->assertStatus(200);
    }

    /**
     * test find product.
     *
     * @return void
     */
    public function test_find_product()
    {
        $token = $this->authenticate();

        $response = $this->withHeaders([
            'Authorization' => 'Bearer '. $token,
        ])->json('GET','api/product/9');

        //Write the response in laravel.log
        \Log::info(1, [$response->getContent()]);

        $response->assertStatus(200);
    }

    /**
     * test get all products.
     *
     * @return void
     */
    public function test_get_all_product()
    {
        $token = $this->authenticate();

        $response = $this->withHeaders([
            'Authorization' => 'Bearer '. $token,
        ])->json('GET','api/product');

        //Write the response in laravel.log
        \Log::info(1, [$response->getContent()]);

        $response->assertStatus(200);
    }

    /**
     * test delete products.
     *
     * @return void
     */
    public function test_delete_product()
    {
        $token = $this->authenticate();

        $response = $this->withHeaders([
            'Authorization' => 'Bearer '. $token,
        ])->json('DELETE','api/product/7');

        //Write the response in laravel.log
        \Log::info(1, [$response->getContent()]);

        $response->assertStatus(200);
    }
}
Test it into the terminal
./vendor/bin/phpunit tests/Feature/ProductTest.php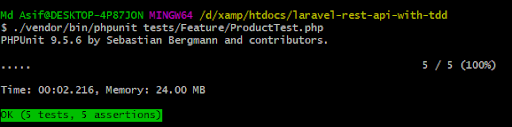
Congratulations! You are done with REST API integration in Laravel. Although the development method seems longer than the usual debugging process after writing code, it is suitable for the early detection of errors. As an early user of the context-driven, agile Laravel web application development process, AvyaTech is a leading Laravel web development company with a decade-long experience. Our Laravel development team has hands-on experience in creating Laravel applications that are intuitive and highly functional.