
Magento 2 customer attributes furnish the necessary information to create a grid in Magento 2 or for Magento 2 creates a custom admin grid.
Description
Follow the steps for adding Magento 2 customer attributes in Magento 2 custom grid and check the screenshots to learn to create a grid in Magento 2 and display the product attributes in the product column.
Introduction
Magento 2offers support of the ordering, fulfillment, and processes of customer management. If your e-commerce business is unique, then you may require more fields along with the fields that the system provides to create a grid in Magento 2 or for Magento 2 to create a custom admin grid.
The user can add customer attribute fields to the Address Book, Account Information, Billing Information, and other sections of the customer account to create a grid in Magento 2. The Magento customer attributes can be used in the part of Billing information during checkout as well as during registration of the customer’s guests in the customer’s account.
Time needed: 1 hour
A step-by-step guide to adding a customer column to the customer grid by Magento 2 customer attributes
- Step 1
Upon registration at the online store of Magento 2, the customer has to fill in the form with his credentials that include first and last name and email address. Magento 2 add customer attribute allows the addition of new attributes to the customer form. The customer may also provide extra information through the creation of new fields in the registration form. If you are using the Magento 2 Commerce Version, then you can create the new fields by the addition of all-new customer attributes in the administration panel. Follow the steps enlisted below, for Magento 2 add customer attribute and to display the new Magento customer attributes in the Customer Grid.
1. Add the new Magento 2 customer attributes in the Commerce version of Magento 2
2. Check the display of the new Magento customer attributes in the customer grid or in the Magento 2 create custom admin grid.
3. Manage the labels and options of Magento 2 add customer attribute to create a grid in Magento 2.
4. Create a grid in Magento 2 or Magento 2 create a custom admin grid and check the customer address attribute - Step 2
Log in to the administration panel and right-click on the menu to create a grid in Magento 2. Click on Stores and then click on Customer under attributes. Select the attributes to check out the list of Magento 2 add customer attributes. If the attributes that you are seeking to create already exist, then disable them. Click on the Add New Attribute button to add the attribute if it does not exist.
Click on the Default Label to enter the name of the field. Add a Unique Attribute code. Select a variety of inputs according to your needs for the creation of the Magento customer attributes. The different types of input labels of the Magento 2 custom grid include:
1. Text field: This label is for a single line of text.
2. Multiple lines: This label is for multiple lines of text. There can be between 2 and 20 lines of data entry.
3. Make use of the Default Value for specifying the initial values of the field.
4. Text area: This label provides an area for multiple lines without any break.
5. Date: This label is for displaying a date field along with a pop-up calendar.
6. Multiple selection: This label allows the selection of multiple values at a time.
7. Drop-down: This label displays a drop-down list from which the user can select only one value at a time.
8. Yes/No: This label is a field that allows the user to make a choice between yes and no.
9. Image file: This label permits the uploading of an image to the gallery, in association with the customer attributes.
Complete the remaining settings of Magento 2 add customer attribute that include the following:
1. Default value
2. Values required
3. Input validation
4. Input/Output filter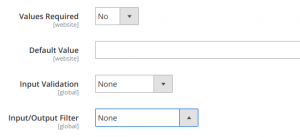
In the above screenshot, there will be no input text in the field, and that is why there is no need for filling in the Input/Output filter and Input Validation.
It is mandatory to fill in the block of settings of storefront properties if the customer attribute becomes a field in the forms reserved for customers of the e-commerce website. If so, then you can choose the destination and time of display of the arrangements. You can also set the position of presentation of the field in the form of the Magento 2 customer grid.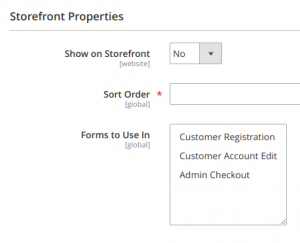
Below is the screenshot of the result after the addition of attributes. Save the form and open the form for registration.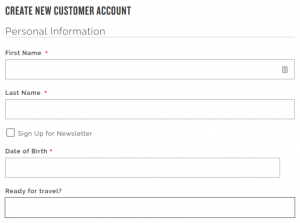
- Step 3
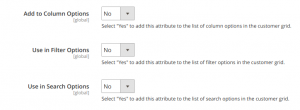
The third step is about appearance in the customer grid. There is yet another block of settings in the Magento 2 customer grid. Navigate to the attribute settings and enable the option “Add to column” before saving. Navigate to Customers next, and click on All Customers. You will be able to view an indexed version of the Customer Grid. View the changes and update the index. Enter the command “bin/Magento indexer:reindex customer_grid”. Rebuild the index to view the new Magento 2 custom attribute in the columns.
Add a column from the Magento customer attributes present in the Magento 2 custom grid. Press the Columns button and check-mark the new attribute. After that, you will be able to view the new attribute as a column.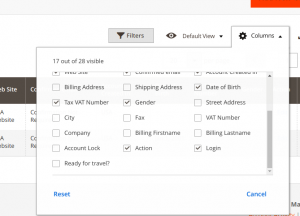
- Step 4
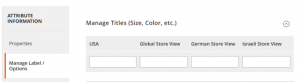
It is now time for the management of the labels and options of the Magento customer attributes to complete the Magento 2 custom grid. It is now time to navigate to the manage label/option tab to create the label name in various languages and adjust the reflection based on the country of every customer.
- Step 5
Add the customer address attribute to the Magento 2 custom grid. If you are seeking to add an attribute of the customer’s address, then create the Customer Address Attribute. Navigate to the Administration panel to click on Stores, and then click on Customer Address, in the Attributes heading to view the entire Magento 2 custom grid.
- Step 6
Use Magento 2 to create a custom admin grid feature. This feature of Magento 2 creates a custom admin grid that allows the creation and display of the customer data or order in a tabular format in the customized module according to the requirements of the user.
Conclusion
Pioneered by AvyaTech, Magento 2 Customer Attributes services, provides thousands of clients across the world with all kinds of facilities for the smooth operation of e-commerce stores. The customer attributes allow the flawless development of storefronts by the incorporation of a variety of labels to create different forms in different languages for the customers of the e-commerce store.
AvyaTech, a Magento eCommerce development services company in India, offers advanced and cost-effective solutions for e-commerce businesses to thrive all across the globe. Contact AvyaTech through email, phone, or Skype for the development of cutting-edge solutions of web development for the establishment of flourishing e-commerce businesses at minimal costs. AvyaTech can also assist with the customization of Magento Edition at low prices. Seek the help of AvyaTech to create a well-established marketing team and establish an iconic brand name in the market. Magento 2 customer attributes add more appeal to the interface of e-commerce websites all over the world.